Use Cases
.png)
Most game characters talk. Convai characters act. When a player says "Can you follow me?" to a Convai-powered NPC in Unreal Engine, the character does not say "Sure, I will follow you" and stay put. It physically starts walking. When the player says "Go to the cube, wait a couple of seconds, then go to the gun, then come back to me," the NPC executes the full sequence without any scripted trigger or animation state machine driving it.
This is the core of Convai's Action System for Unreal Engine 5: structured, LLM-driven commands that map player prompts to physical behaviors in the scene. The LLM does the intent recognition and action planning. Your Unreal Engine blueprints execute the result. Together, they create NPCs that are genuinely present in the world.
This blog covers Part 1 of the Convai Unreal Engine Actions series: Phase 1 Default Actions, created specifically for the updated Convai Unreal Engine Plugin, which can also be found on the Fab Store. By the end you will have an AI NPC navigating your scene on spoken command with zero Blueprint scripting. We will also preview Phase 2 Custom Actions and Phase 3 Parameterized Actions so you understand the full architecture from the start.
Watch the full tutorial here:
Also read: How to Use Dynamic Context in Convai to Build AI Characters That React in Real Time
The standard conversational AI pipeline is: Speech-to-Text like Nvidia’s ASR captures the player's voice. A Large Language Model (LLM) generates a response. Text-to-Speech delivers it. The NPC speaks. The loop ends.
This works for information retrieval. Ask an NPC "what is the lore of this region" and a dialogue response is fine. But the moment a player wants an NPC to do something — navigate somewhere, demonstrate a procedure, interact with an object, guide them through a space — dialogue alone fails.
The traditional workaround is scripted behavior trees, animation state machines, and hardcoded triggers. A developer anticipates every action a player might want, writes Blueprint logic for each, and connects them to specific dialogue branches. This works until a player does something unexpected, which is always.
Convai's Action System solves this with Prompt-to-Action (P2A): a player speaks a command in natural language, the LLM maps the intent to a registered action label, and the Unreal Engine executes it physically in the scene. No hardcoded trigger. No pre-anticipated branch. The character acts on what the player actually said, not what a developer guessed the player might say.
According to the 2024 State of the Game Industry report by the Game Developers Conference, 47% of studios are actively exploring AI-driven NPC dialogue and action systems as a development priority. The gap between player expectation and what scripted behavior trees deliver is closing, but only for teams that add the action layer on top of the conversation layer.
Convai's Action System is that layer!
The Convai Action System is organized into three phases, each building on the last:
Underneath all three phases is a shared mental model with three components:
The queue is important. The LLM can emit a sequence of actions in a single response. "Go to the cube, wait two seconds, then go to the gun, then come back to me" is a four-action sequence. The queue ensures each action completes before the next starts. Your handler is responsible for signaling completion via HandleActionCompletion.
Also read: Quick Setup Guide: Add Conversational AI to Any Unreal Engine Project with Convai
These terms describe opposite design philosophies for AI NPC behavior.
Action-to-dialogue is the classic model: something happens in the game, and the character talks about it. A target is hit. The character says the player hit the target. The character is a narrator. It describes the world but does not participate in it.
Prompt-to-Action (P2A) inverts this. A player prompt or game event maps directly to a physical action the engine executes. The character is not narrating. It is participating. When a player says "follow me," the NPC starts walking. When a player says "go to the cube then come back," the NPC navigates the sequence.
There is also action-to-action: after completing one action, the character can automatically trigger the next in a sequence without player input. Convai’s Narrative Design feature is built to enable this capability for handling complex scenarios. For simple scenarios, like the one in this tutorial, The NPC completes the cube navigation, the queue advances, it waits two seconds, then continues to the gun. No player intervention. The chain of commands from a single spoken prompt executes as a coherent sequence.
P2A reliability depends on context quality. If the LLM does not know what objects are in the scene, what the player is holding, or what just happened, it cannot make good action decisions. That is the job of Dynamic Context. The Environment struct that powers the Action System is the core of Dynamic Context for actions: it tells the LLM exactly what it can act on, by name, in the current scene.
You can inspect exactly what the LLM received on any given turn, including which action templates were available and which objects were registered, using Mindview. If an NPC makes a wrong action decision, Mindview shows you whether the relevant object was in the Environment or missing entirely.
Phase 1 gives you four navigation actions with zero Blueprint scripting: Move To, Follow, Stop Moving, and Wait For. Here is the complete setup.
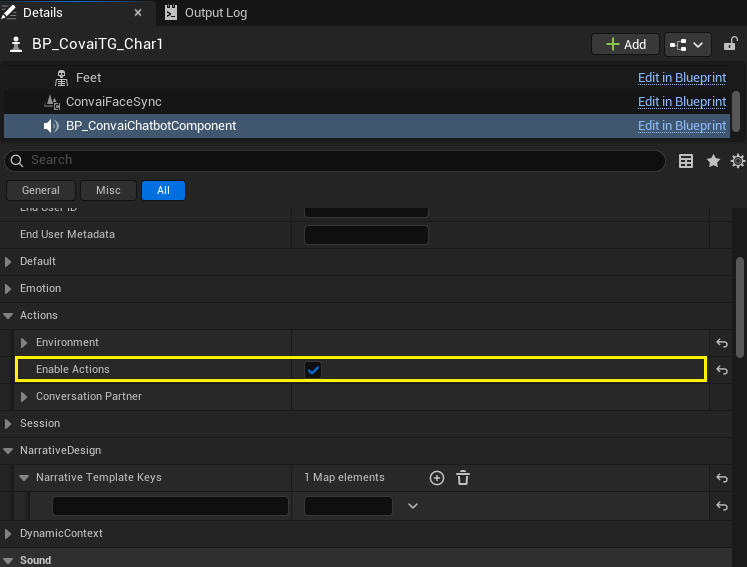
Select your AI character actor in the level. In the Details panel, scroll down to find the Convai Chatbot Component and click on it. Navigate to the Convai > Actions category. Tick the Enable Actions checkbox.
This toggle controls whether the chatbot's Environment struct is serialized as action_config when the character connects to the Convai server at runtime. Without it enabled, the server treats the bot as conversational-only regardless of what else you configure. It is the master switch for the entire action system.

The bot can only target things you have explicitly told it about. In the same Convai > Actions category, find the Environment struct and expand it. Expand Objects. Click + to add a new entry.
For each object, fill in:
You can add as many objects as you like. In the demo, we registered a cube and a gun. The character would later navigate to both in a single sequence. Every prop you want the NPC to interact with needs an entry here before you hit Play.

The default Move To and Follow actions need the character to physically be able to walk. Convai ships an editor utility that wires this up for you in one click.
In the Content Browser, navigate to your character Blueprint — in this case, the MetaHuman blueprint. Right-click on it, select Convai, and click Setup Convai Pawn Movement.
What this utility does depends on the blueprint's parent class:
For MetaHumans, which use ACharacter, the utility tunes the existing movement component without breaking the existing animation rigging. For custom actors, if the utility logs a warning, the fix is to reparent to APawn and re-run.
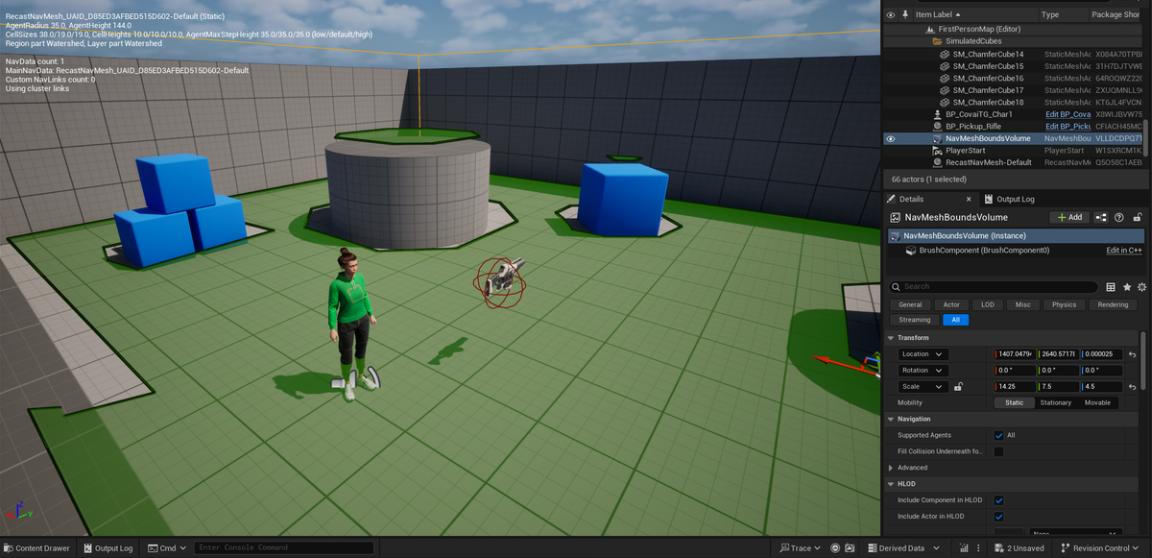
The movement system uses Unreal's navigation, so you need a NavMeshBoundsVolume covering the walkable area.
Go to Window > Place Actors. In the search field, type nav. Drag and drop the NavMeshBoundsVolume into your level. Scale it to cover the entire area where you want the character to walk.
Press P on the keyboard with the level editor focused. This toggles the green navigation overlay. Green areas are walkable. If a region is not green, the volume does not cover it, or the geometry is marked as non-walkable (too steep, too narrow, or blocking volumes in the way). The character will navigate correctly to any destination that shows green.
If the bot acknowledges a command but does not move, the NavMesh is almost always the culprit. Check that the destination is inside a green zone.

Hit Play and wait for the Convai character to connect. Once connected, try these commands:
That last command demonstrates the action queue in action. A single spoken prompt becomes a sequential behavior: navigate to cube, wait, navigate to gun, navigate back to player. No scripted trigger. No pre-built animation state machine. The LLM planned the sequence from the natural language command.
The four default actions available out of the box:
Also read: Real-Time AI Conversations and Facial Animation for MetaHumans in Unreal Engine with Convai
Phase 1 gives you navigation. Phase 2 lets you wire any Blueprint logic to a named action the LLM can trigger conversationally.
The setup is three steps: declare the action template, bind a Blueprint handler, dispatch by action name.
In the same Convai > Actions > Environment > Actions list where you see the default actions, click + to add a new entry. Give it:
The Rendered String field below auto-populates with what gets sent to the LLM. For a Print action with no parameters it reads: Print — Print a debug message to the screen. This is your sanity-check: if the rendered string looks wrong, the LLM will receive wrong context. Convai V2 lets you also write directly to the Rendered String and the structured fields update — useful for quickly pasting action templates between characters.
Open your character Blueprint. In the Components tab, click the Convai Chatbot component. In the Details panel, find the Events category and click + next to On Action Received Event V2. UE drops a bound event into the Event Graph.
The event delivers a Sequence of Actions array. For each action in the array:
The queue matters even for single-action sequences. Without calling HandleActionCompletion, the queue stalls and the next action in a sequence never executes. Always call it, even if your action takes no time.
The EventText parameter on HandleActionCompletion and AbortActionSequence is a Dynamic Context hook. Passing "Printed the message" back tells the LLM what happened, keeping its context current for the next conversational turn without requiring a separate Add Context Event call.
Also read: Adding Actions for AI Characters in Unity with Convai
Most real-world actions need data. "Wait for 5 seconds" needs a number. "Pick up the cube" needs an actor reference. "Put the ball on the table" needs two actor references and a preposition connecting them.
Phase 3 Parameterized Actions adds typed parameters to action templates. The LLM fills the values from the player's words and the current scene context. Your Blueprint reads them via typed accessor nodes.
An important design principle from the docs: all value fields on FConvaiResultParam are populated best-effort regardless of declared type. A String-typed param whose value happens to match a scene object name will still have RefValue set. Read whichever field is convenient for your handler — the Type just signals which slot the LLM was targeting.
Numeric param — Wait For: The default Wait For action already uses a Number param named "time in seconds". In your handler, call Get Param As Number with the action and param name. Wire the float to a Delay node. Call HandleActionCompletion after the delay. Ask the character "wait for 3 seconds" and it pauses, then continues the sequence.
Actor reference — Greet a specific character: Declare a Greet action with a Reference param named "target" and description "Who to greet". In the handler, call Get Param As Ref to get the FConvaiObjectEntry. The Ref field is the resolved AActor pointer. Use it to face the character, trigger an animation, play audio.
Compound action with connector — Put X on Y: Declare a Put action with two Reference params: "ball" (no connector, first param) and "table" (connector: "on"). The rendered string becomes: Put "<ball: ref>" on "<table: ref>". Read both params with Get Param As Ref. This models complex spatial interactions the LLM infers from natural language like "put the blue ball on the wooden table".
Constrained choices — Set Mood: Declare a Set Mood action with a String param named "mood" and Choices: happy, sad, angry. The wire format includes [happy|sad|angry] constraining the LLM's output. The parser validates against the list and logs a warning if a non-listed value slips through.
Enum-typed — same Set Mood with a UENUM: Switch the param Type to Enum and select your EBotMood UENUM. The Choices block auto-derives from the enum's display names. Read with Get Param As String and convert to the enum value with the BP node UE generates for your enum type.
Also read: Convai Narrative Design: How to Build Structured LLM-Powered NPC Story Flows
Setting up action templates and registering objects is the infrastructure. Making action decisions intelligently requires Dynamic Context.
The Environment struct that powers the Action System is one component of Dynamic Context. But you can extend it with live game state variables that influence how the LLM decides which action to select and what to say alongside it.
The four key Blueprint functions in the Dynamic Context system:
A practical example of why this matters for action quality: a player in a training simulation asks the NPC "what should I do next?" Without Dynamic Context, the LLM guesses. With Set Context State tracking which procedure steps have been completed, the NPC navigates to the next station and gives a contextually correct instruction because it knows exactly where in the sequence the trainee is.
Another example: a player in a shooting range scenario has fired 6 bullets and hit 3 targets. Without Set Context State tracking bullets_shot and targets_shot, the NPC cannot calculate accuracy. With both variables tracked, it says "You've taken six shots and cleared three targets. That's a solid 50% hit rate." The LLM did that math from live game variables, not a pre-scripted response.
Dynamic Context also powers vision awareness. When the Convai Vision component is enabled, the character receives a live camera feed and can describe what it sees. Combined with the Action System, the character can navigate to objects it can see, respond to the player's visual focus, and react to environmental changes without any scripted triggers.
For a complete Dynamic Context walkthrough including the shooting range demo, the target tracking blueprint, and vision setup, see the dedicated blog post: How to Use Dynamic Context in Convai to Build AI Characters That React in Real Time.
The Phase 1 navigation setup is the foundation. The full action architecture opens up use cases that scripted behavior trees cannot reach:
An emerging use case worth watching: when AI characters can navigate, act on objectives, and track state via Dynamic Context, you can assign two NPCs a goal and let them play your game against each other before shipping. Every unexpected behavior they surface, every navigation path that breaks, every action queue that stalls, is a bug you find pre-launch. The same Action System infrastructure that makes characters feel alive in production also makes them useful as automated testers in development.
Phase 1 default navigation is running. Here is the path forward:
Open Mindview to inspect exactly what action contract and context variables reached the LLM on any given turn. If the character's action decisions feel wrong, Mindview is the fastest way to find out why.
The Convai Unreal Engine plugin is available on the Epic Games FAB Marketplace. Full documentation for the Action System, Dynamic Context, and all plugin features is at docs.convai.com. For questions, the Convai Developer Forum is the fastest way to get support from the team and the community.
Enable Actions on the Convai Chatbot Component in the Details panel, run Setup Convai Pawn Movement on your character Blueprint, add a NavMeshBoundsVolume to the level (press P to verify green coverage), and register scene objects in the Environment Objects list. The character will then respond to voice commands like "Go to the cube" or "Follow me" with physical navigation.
Action-to-dialogue means the character talks about something after it happens. Prompt-to-Action inverts this: a player prompt maps directly to a physical action the engine executes. Convai's Dynamic Context makes action selection reliable by feeding the LLM real-time scene state, registered objects, and game variables at every turn.
Move To (walk to a target), Follow (continuously track a character), Stop Moving (halt movement), and Wait For (pause for a duration). All four work with zero Blueprint scripting once the NavMesh and locomotion are configured via the Phase 1 setup.
In the Details panel, add a new FConvaiAction entry under Environment Actions with a Name and Description. In the character Blueprint, bind OnActionReceivedEvent_V2, loop through the Sequence of Actions, switch on the Action name, run your Blueprint logic, and call HandleActionCompletion to advance the queue.
Parameterized actions pass typed data to action handlers: actor references, numbers, strings, booleans, or enum choices. Use them when an action needs to know which object to interact with, how long to wait, or what state to apply. The LLM fills parameter values from natural language input and resolves actor refs against the registered Environment.Objects list. See the full Phase 3 Parameterized Actions guide.


