Use Cases

.jpg)
Convai now supports MCP inside Unity, so you can build AI character-led experiences by prompting an AI coding agent instead of wiring components by hand. With the Convai Unity MCP integration, an agent like Codex, Claude Code, or Cursor connects a Convai AI mind to an avatar in your scene, sets up hands-free or push-to-talk conversation, adds a chat UI, drops objects into the environment, and enables camera-based Vision, all from natural-language prompts you type in a terminal or in Unity's own AI Assistant window.
You describe the virtual AI avatar you want, the agent edits your Unity project, and you check the Hierarchy before pressing Play. This guide follows the full tutorial: a fresh Unity 6 project, the Convai Unity MCP setup, a Codex connection, a hands-free conversational AI character, a switch to push-to-talk, then scene props and Vision so the character can describe what it sees.
▶ Watch the full walkthrough below:
Also, you can grab the Convai Unity plugin on the Asset Store.
Convai Unity MCP, documented as the AI coding assistant integration, adds Convai-specific tools to Unity's official MCP server so a coding agent can inspect, configure, and diagnose Convai components in your project instead of you clicking through the Inspector.
The Model Context Protocol is the open standard that lets AI agents talk to tools and applications through a shared interface. Developers adopted it fast: public MCP server repositories on GitHub grew from about 2,000 at the start of 2025 to more than 12,000 by 2026, and Unity now ships its own MCP server through the com.unity.ai.assistant package. That server gives agents generic tools for GameObjects, scripts, assets, and scene operations, but it knows nothing about conversational AI characters.
The Convai Unity SDK registers 20 SDK-aware tools under a Convai.* namespace, at tool contract version 4, that read and mutate only Convai components: ConvaiManager, ConvaiRoomManager, ConvaiPlayer, ConvaiCharacter, actions, lip sync, transcripts, and narrative sections. Unity's tools keep owning generic scene work, and Convai's tools own the AI character layer. The character's brain, meaning its LLM, voice and language, personality, and knowledge bank, stays hosted on Convai.
The Stack Overflow 2025 Developer Survey found that 84% of developers use or plan to use AI tools, with about half of professional developers using them daily. Most of those developers already have a coding agent open. Point it at the Convai tools and it can build the AI avatar for you.
Convai layers three things over Unity's server.
Convai's engineers built in three guardrails:
Mutating tools also run in Edit Mode only. Call one during Play Mode and it returns a PLAY_MODE_ACTIVE failure code rather than half-configuring a live session.
The plumbing costs you more time than the AI does: adding components, pasting a Character ID, binding a manager, wiring a chat UI, choosing an input mode, then testing each one in isolation. With MCP you write a sentence instead.
The payoff is iteration speed. In the tutorial, one prompt produces a working hands-free AI character with a chat UI in about five minutes, and the follow-up switch to push-to-talk takes two more. You can test five interaction designs in the time manual wiring gives you one.
If you haven't added a Convai AI mind to an avatar yet, start with the Convai Unity SDK setup tutorial and come back here.
The tutorial starts from a new Unity 6 project called Convai MCP Setup, with the Convai SDK imported, the API key configured, and the sample character in the scene.
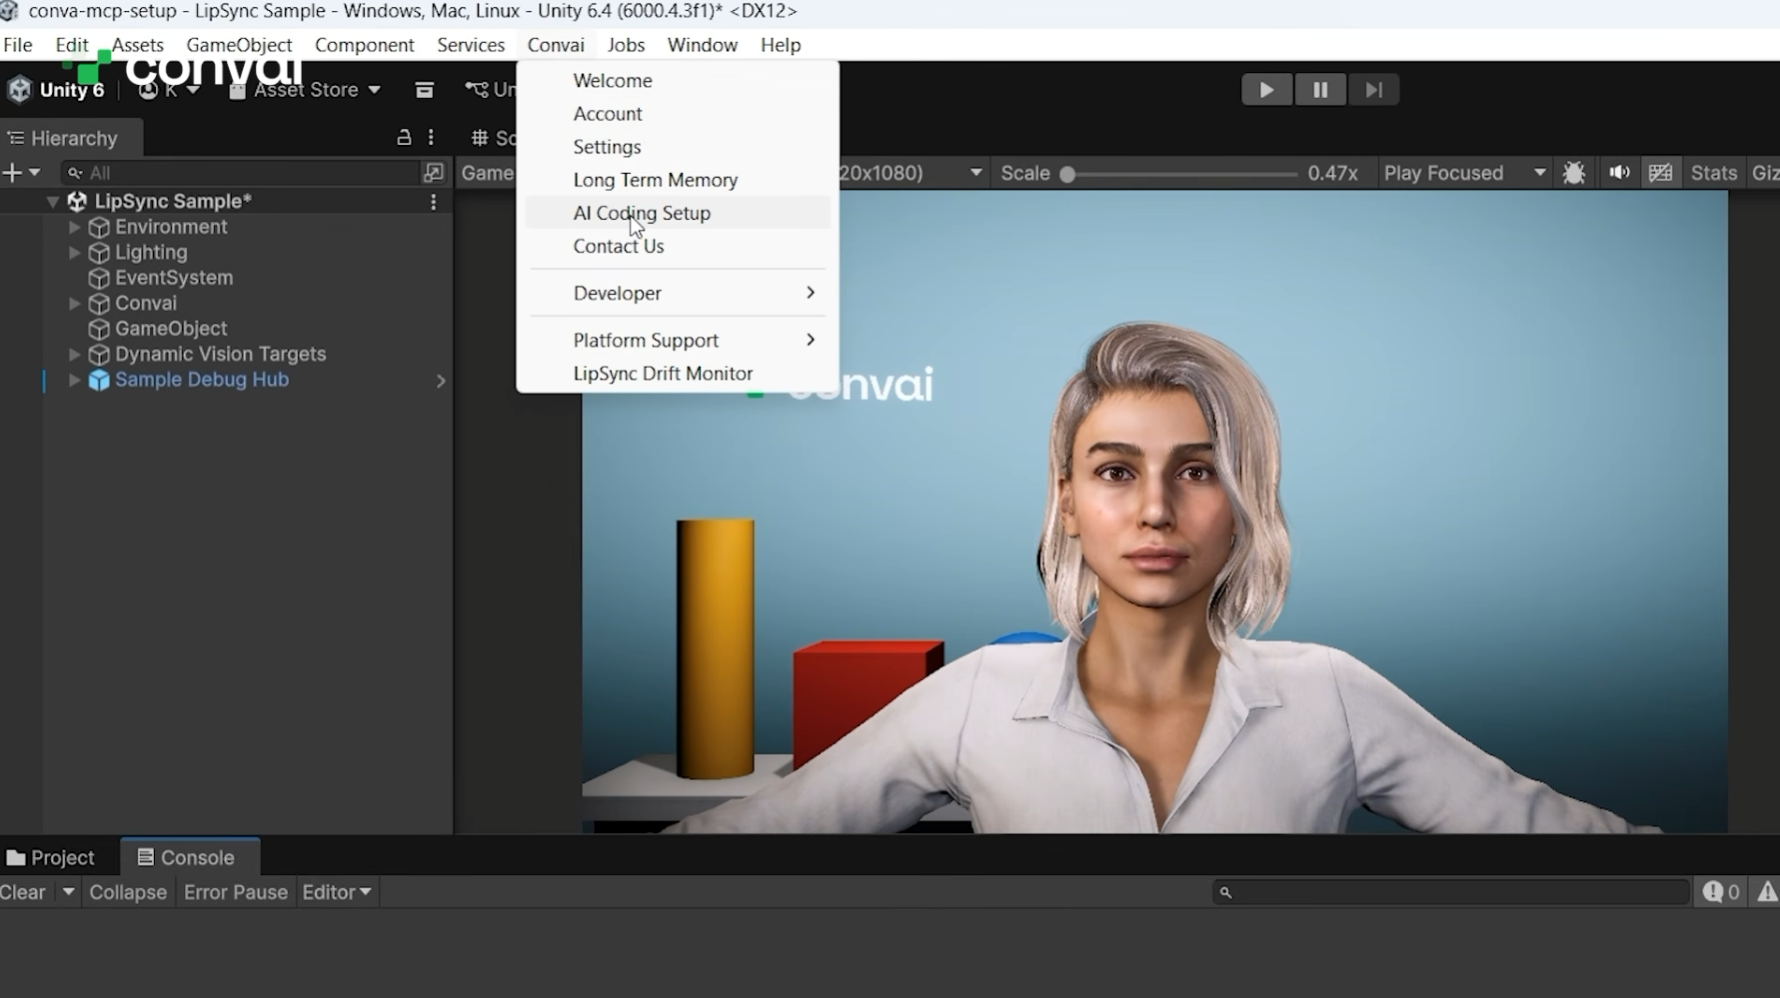
In the Unity Editor menu bar, choose Convai > AI Coding Setup. The AI Coding section of the Convai Editor window opens. Its Setup Health card reports four readiness rows: Unity 6000+, Unity AI Assistant, Packaged Convai Skill, and Convai MCP Tools. Each row reads Ready or Needs attention, with an inline Fix button where a repair path exists.
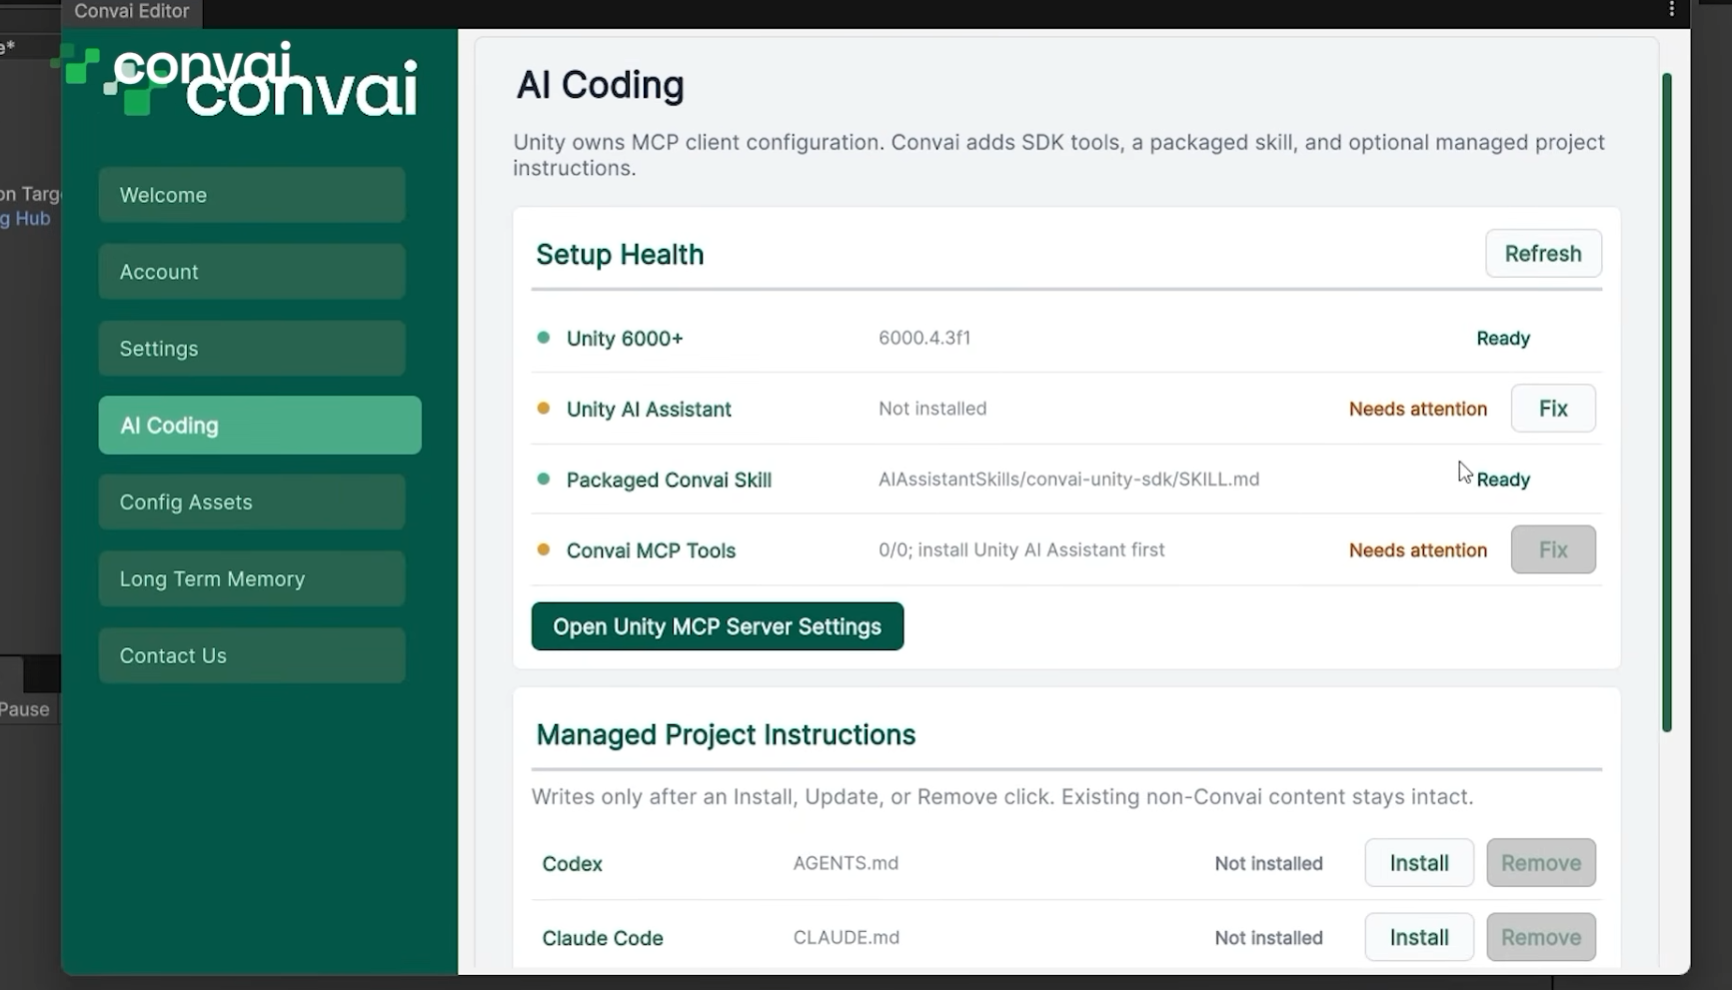
On a fresh project, Unity AI Assistant shows Needs attention. Click Fix and confirm the prompt. Unity installs the pinned Assistant package through Package Manager, recompiles, and updates the row. Don't click Fix while Unity is compiling, updating packages, or in Play Mode. The repair won't start, and it won't exit Play Mode for you.

Open the Assistant window and start a new session, then confirm you have accepted the usage terms in the Gateway tab. Next, open Project Settings > AI > Unity MCP Server, either from the menu or via the Open Unity MCP Server Settings button in the AI Coding section, and accept Unity's MCP Server terms. You can then check the status of the Unity bridge and confirm which MCP clients connect to your project.
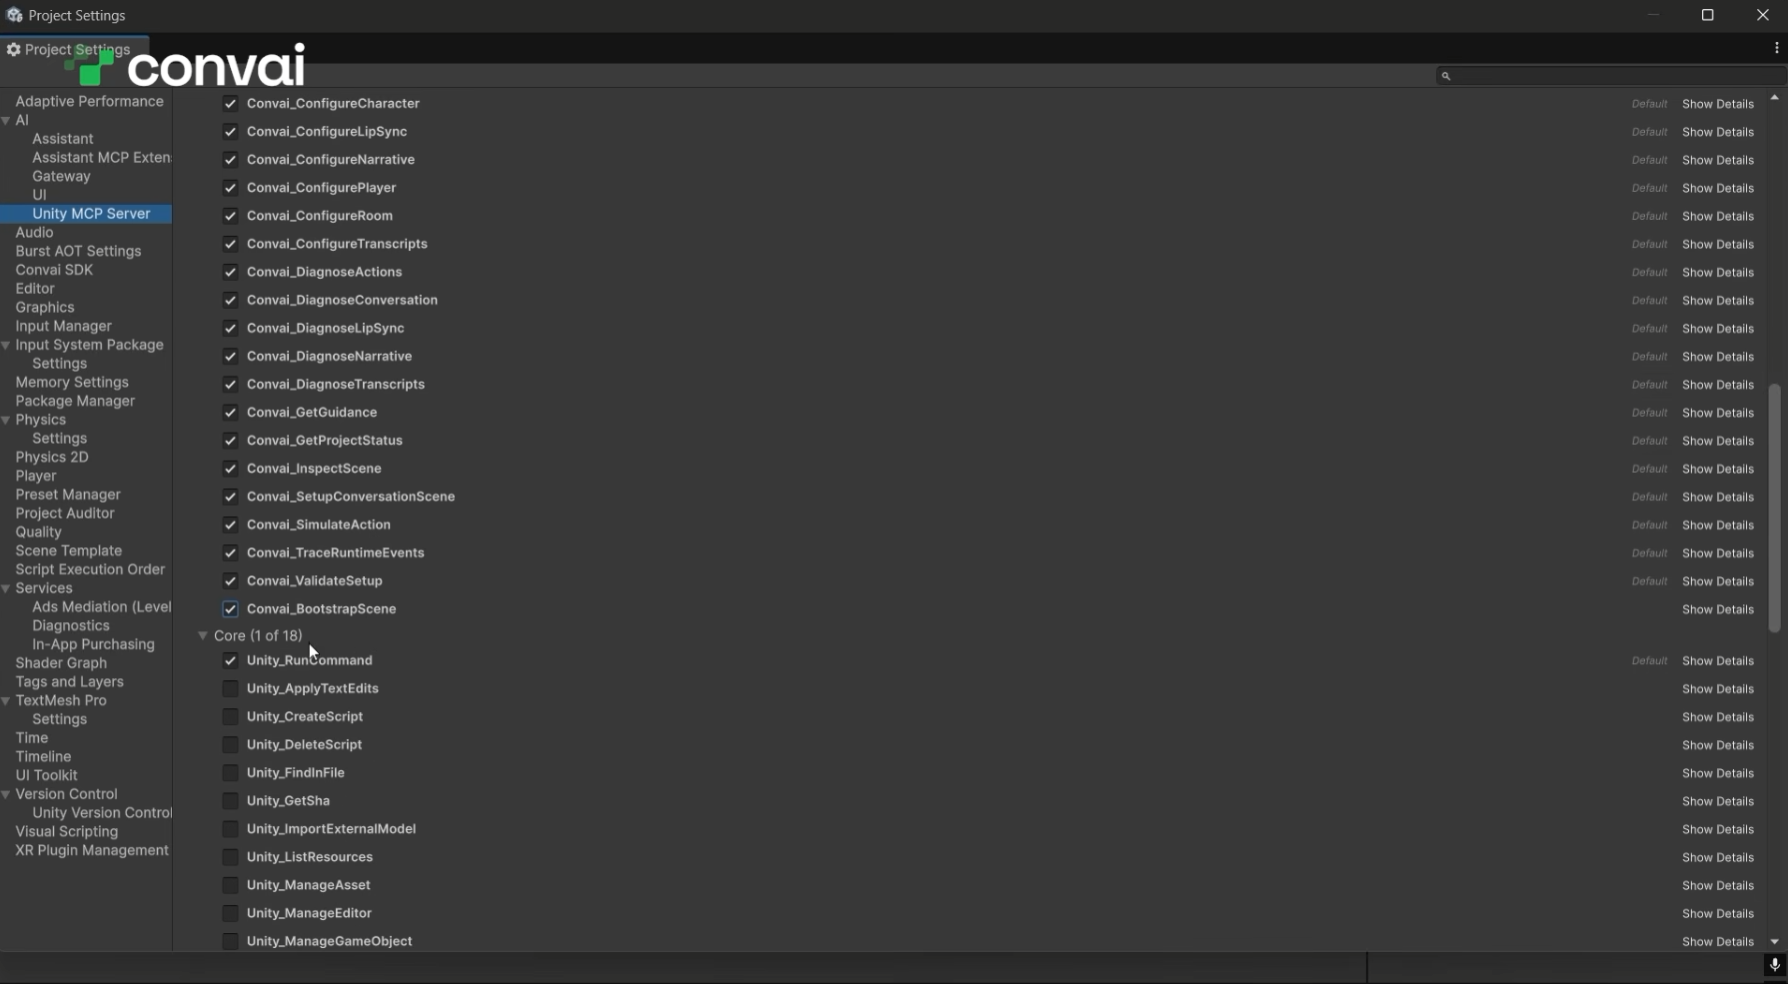
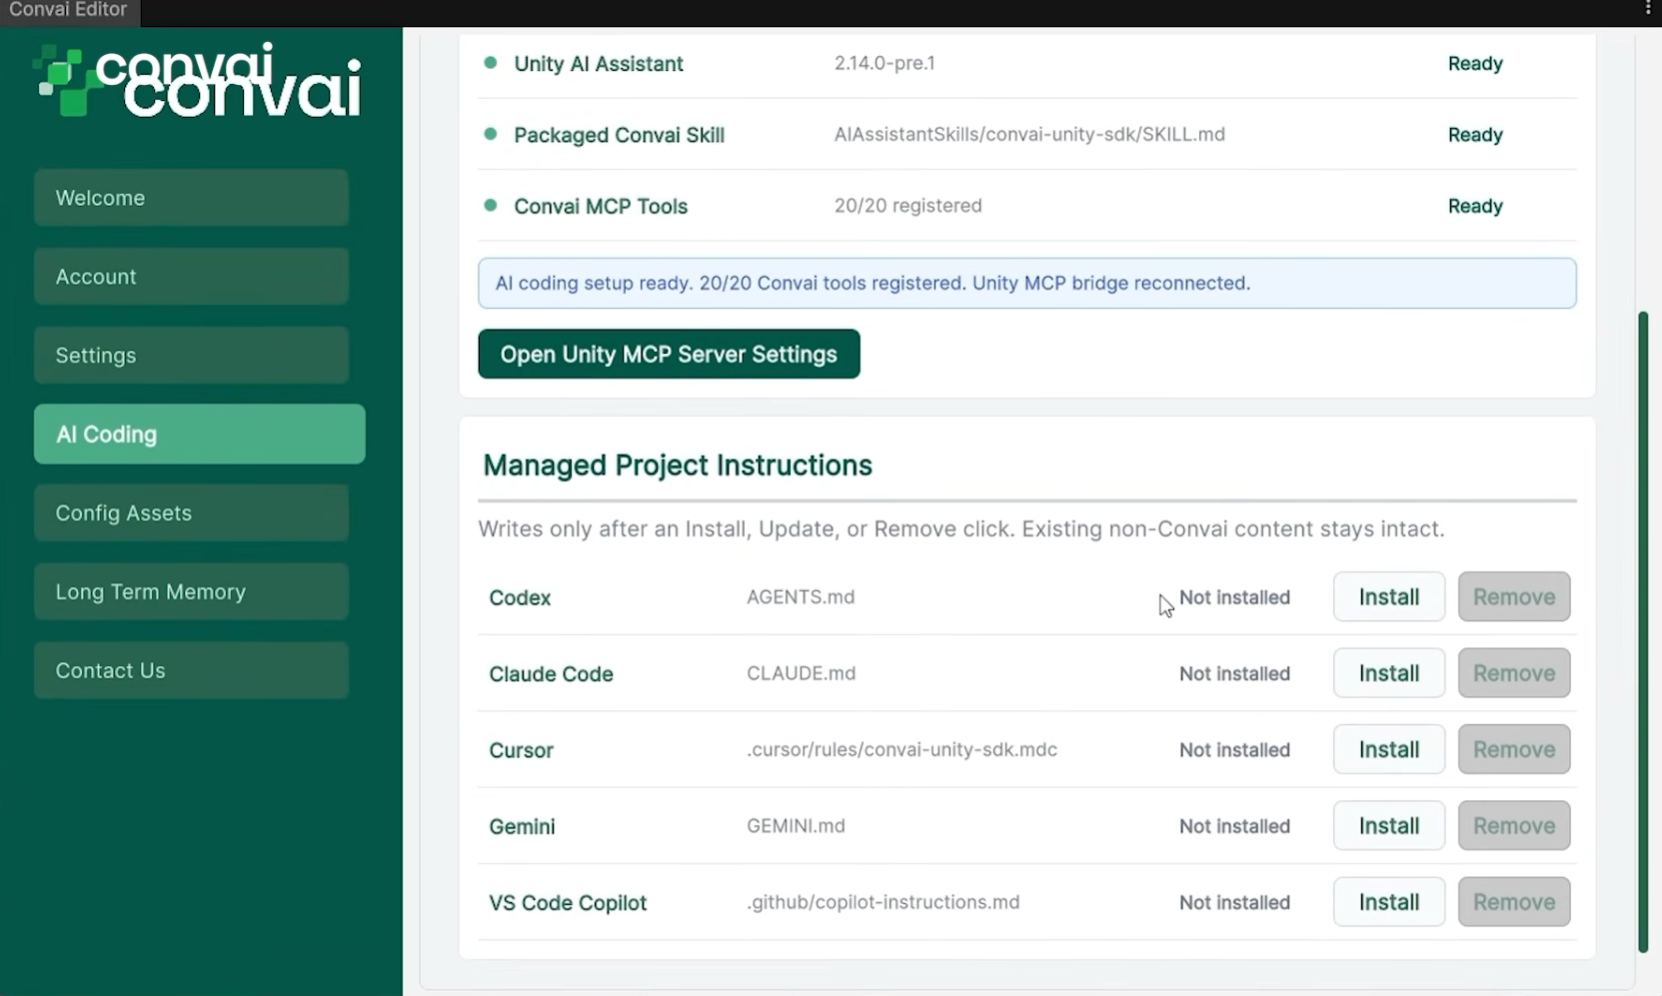
The same panel lists the Convai skills shipped inside the package. The Convai MCP Tools row should read 20/20 registered. You can also enable Unity's core skills alongside Convai's if you want the agent to have full generic scene control. If the count is lower, or the row lists a missing or unexpected tool name, click Fix to force a registry refresh and recompile.
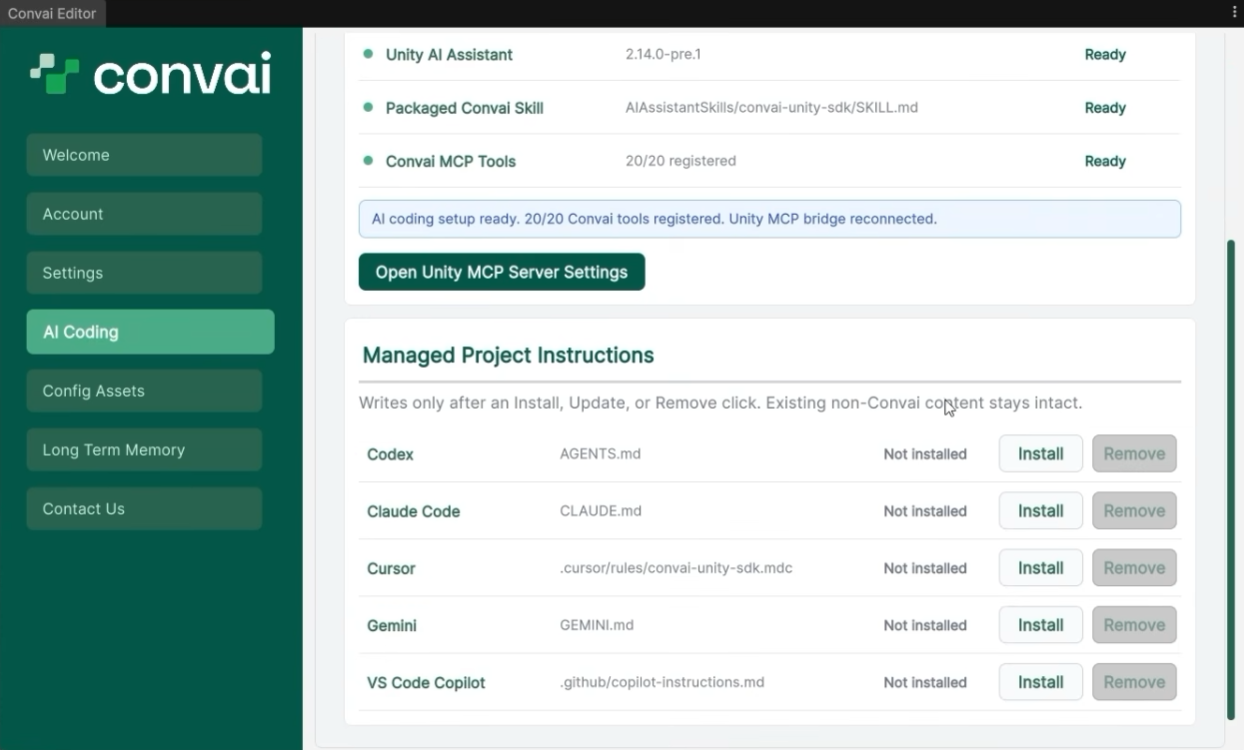
Scroll to Managed Project Instructions and click Install next to your agent. The tutorial uses Codex, which writes an AGENTS.md at the project root. Convai writes a sentinel-delimited block marked by <!-- BEGIN CONVAI UNITY SDK --> and <!-- END CONVAI UNITY SDK -->, preserving anything already in the file. The button becomes Update afterwards, and Remove deletes the block without touching the rest of the file.
In Codex, type /mcp. It reports the connection status, and Unity prompts you to allow the new MCP connection. Approve it and you can start prompting. The full prerequisite check lives in the AI coding assistant quick start.
Setup is complete when all four Setup Health rows read Ready and Convai MCP Tools reads 20/20 registered.
Also read: Convai MCP for Unreal Engine: Build AI Characters with Codex and Claude Code
Convai supports five agents, each with its own managed instruction file. See Supported coding agents for the per-agent install behavior.
The install logic is identical across all five. The SDK creates the file and any missing parent directory, preserves everything outside the sentinel markers, and matches the file's existing line endings. Each block points the agent at Packages/com.convai.convai-sdk-for-unity/AIAssistantSkills/convai-unity-sdk/SKILL.md and its linked references.
You can also stay inside the editor. Open Window > AI > Assistant and prompt the same tools from Unity instead of a terminal.
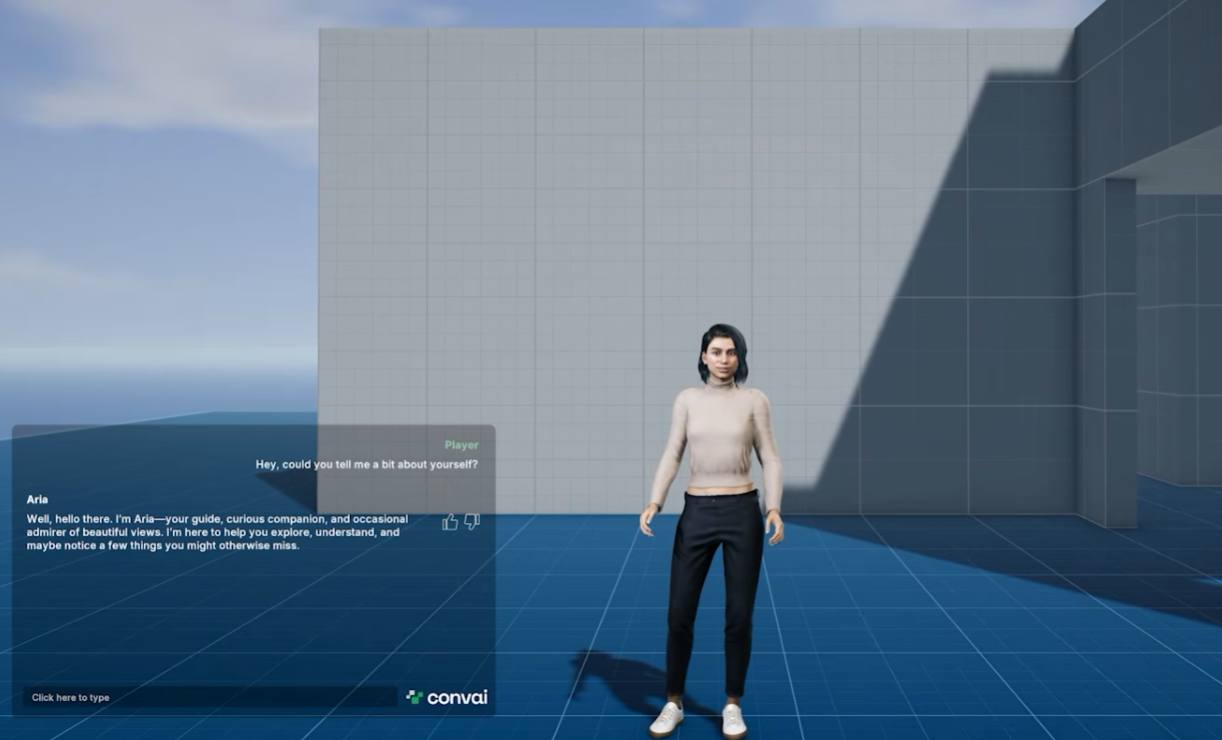
With Codex connected and starter assets imported for a first-person test scene, you paste one instruction: create a hands-free conversation demo in a new scene using the sample avatar and the supplied Convai character details, and add a chat UI.
Five minutes later, Codex reports the scene is ready. Press Play, ask "Hey, could you tell me a bit about yourself?", and Arya answers in character:
"Well, hello there. I'm Arya, your guide, curious companion, and occasional admirer of beautiful views. I'm here to help you explore, understand, and maybe notice a few things you might otherwise miss."
Behind that one prompt, the agent called Convai.SetupConversationScene for end-to-end Audio conversation setup with recommended defaults, then Convai.ConfigureTranscripts in ChatUI mode to surface the transcript. The tool picks its target in a fixed order: an explicit instance ID first, then one unambiguous existing component, then a safe placeholder if nothing exists. A missing Character ID stays an explicit blocker, so Convai.ConfigureCharacter returns complete=false with requiredInputs=["characterId"] rather than inventing one.
You ask for it. The tutorial prompts Codex to convert the demo to push-to-talk, and it lands in a couple of minutes. Hold T, speak, and the character responds. T is the documented default for pushToTalkKey on Convai.ConfigureRoom, alongside inputMode (HandsFree by default), connectionType, connectOnStart, visionMode, and serverEndpoint.
Input mode is the kind of decision you want to A/B test in a training simulation or XR experience. Here it costs you one line instead of a component hunt.

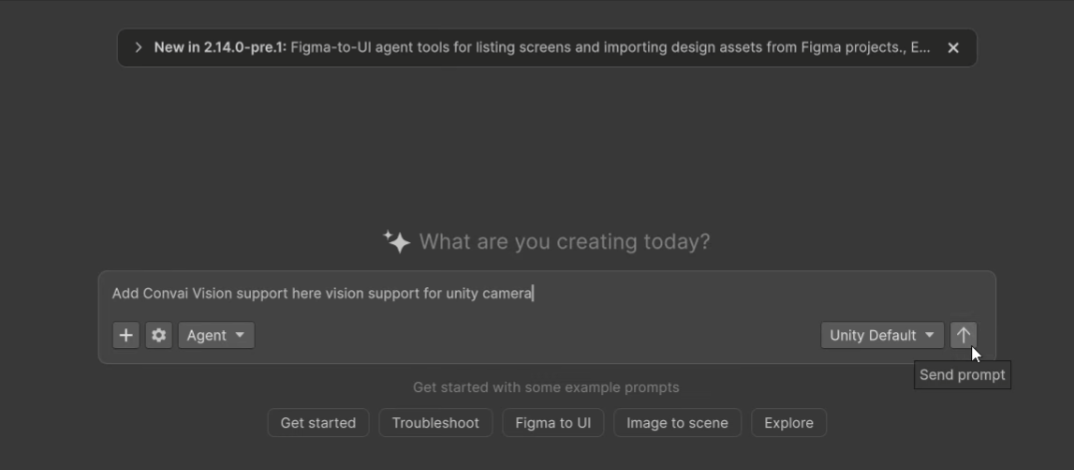
Two more prompts handle this. The agent adds props to the scene with Unity's own MCP tools, since generic GameObject creation belongs to Unity rather than Convai, then enables Vision for the Unity camera.
Vision is not one of the 20 foundation tools. The agent configures it by editing ConvaiRoomManager and adding a ConvaiVisionPublisher component, which streams frames to Convai over WebRTC alongside the audio conversation.
Two settings control whether Vision turns on:
The visionMode field on Convai.ConfigureRoom (Auto by default) governs the dynamic vision policy, meaning whether Convai reasons over a rolling buffer of sampled frames or reacts to every frame as it arrives. It shares its respond-mode vocabulary with Dynamic Context.
The tutorial then quizzes the character. Asked "Hey, can you describe the scene to me, please?", it answers:
"Under a beautiful soft blue sky, I see a large purple sphere resting on a pale yellow cube to our left. Moving right, there is a blue sphere atop an orange cube, followed by a pale mint green sphere on a coral red cube. Each sphere has bright animated bands of light flowing continuously across its surface."
The character reads colours, spatial relationships, left-to-right ordering, and surface detail live from the Unity camera. You built all of it from prompts.
Also watch: Build Vision-Based Conversational AI Characters | Convai Unity Tutorial
The full catalog, from the MCP tools reference:
Convai.BootstrapScene is the only tool disabled by default. Prefer Convai.SetupConversationScene for end-to-end setup. You can toggle any tool under Edit > Project Settings > AI > Unity MCP Server.
Two tools help most when something breaks. Convai.DiagnoseConversation runs in both Edit and Play Mode and returns readyToRun, ranked evidence, and an issues array where each entry carries a stable code, an autoFixable flag, and a suggestedTool with arguments, so the agent can propose the fix itself. Convai.TraceRuntimeEvents maintains a bounded editor-only buffer of up to 256 runtime events, with transcript capture off by default.
Convai.GetGuidance covers nine topics: Overview, Setup, Actions, DynamicContext, Vision, Narrative, Embodiment, Events, and Runtime. Each returns a summary, prerequisites, an ordered workflow, and documentation paths. A well-behaved agent calls it before configuring a feature it hasn't touched yet.
Check three things when setup breaks: the Assistant package, the packaged skill, and the 20-tool catalog.
A tool-registration repair refreshes Unity's registry, forces an asset refresh and recompile, then polls for up to 60 seconds, retrying about once per second. It ends by restarting Unity.AI.MCP.Editor.UnityMCPBridge so external MCP clients see the refreshed catalog without a full Unity restart. See the AI coding assistant troubleshooting guide for the full matrix, or ask on the Convai Developer Forum.
Analysts put the digital human market at about USD 7.96 billion in 2026, up from USD 6.28 billion in 2025, and enterprise demand for realistic virtual assistants drives most of that. Here is where Unity teams are pointing it:
Also watch: How to Add AI Characters to Unity 6 VR Projects (Meta Quest & PCVR)
What is Convai Unity MCP? Convai Unity MCP is the Convai Unity SDK's AI coding assistant integration. It adds 20 Convai-specific tools to Unity's official MCP server so a coding agent such as Codex, Claude Code, or Cursor can build and configure Convai AI characters in your Unity project from natural-language prompts.
Which coding agents does Convai Unity MCP support? Codex, Claude Code, Cursor, Gemini, and VS Code Copilot. Each gets its own managed instruction file: AGENTS.md, CLAUDE.md, .cursor/rules/convai-unity-sdk.mdc, GEMINI.md, and .github/copilot-instructions.md.
How do I set up Convai Unity MCP in Unity 6? Open Convai > AI Coding Setup, fix any Setup Health row that needs attention, accept the Unity MCP Server terms under Project Settings > AI > Unity MCP Server, confirm Convai MCP Tools reads 20/20 registered, then click Install next to your agent under Managed Project Instructions. In Codex, type /mcp and approve the connection prompt in Unity. The quick start covers each step.
What are the requirements for the Convai AI coding assistant? Unity 6 (6000.x) or newer, the Convai Unity SDK installed, and com.unity.ai.assistant version 2.13.0 or later and below 3.0.0.
Can I use Convai MCP without leaving the Unity Editor? Yes. Open Window > AI > Assistant and prompt the agent from inside Unity instead of using an external terminal.
Is Convai Unity MCP safe to run on an existing project? Convai tools never accept or return API keys, mutating tools use Unity's Undo system and never save the scene for you, and dryRun defaults to true so the agent previews changes first. Mutating tools run in Edit Mode only and return PLAY_MODE_ACTIVE if called during Play Mode.
How do I enable Vision so my AI character can see the scene? Ask your agent to enable Vision for the Unity camera. Vision is not one of the 20 foundation tools, so the agent configures it by editing ConvaiRoomManager and adding a ConvaiVisionPublisher component. Set ConvaiRoomManager.Connection Type to Video, because on Audio the publisher stays idle, and make sure a frame source such as CameraVisionFrameSource exists under the room hierarchy.
Install the SDK, run Convai > AI Coding Setup, connect Codex, Claude Code, Cursor, Gemini, or VS Code Copilot, then prompt your way from an empty Unity 6 scene to a talking, scene-aware AI avatar with a chat UI, your choice of voice input, and Vision. It takes minutes rather than an afternoon.
Ready to build? Sign up at convai.com · Read the Convai Unity SDK documentation · Read the AI coding assistant quick start · Get the plugin on the Asset Store · Ask questions on the Developer Forum
Follow Convai: LinkedIn · Reddit · X/Twitter · Instagram · YouTube


