Use Cases

.jpg)
A museum level with sixty-three artworks got named and described in about two minutes. Thirty-two more objects came back flagged for a human to look at. That second number is the one worth talking about.
Scene Tagger walks an Unreal Engine level, finds the objects that carry meaning, photographs each one from an angle it picks, and writes a name and a description for it. The whole pass runs inside the Unreal Editor. Then it hands you a review list and stops, because the level stays untouched until you apply the results.
That pause is the design. The tool is a first-draft generator, and the skill it asks of you is knowing what a good tag looks like so you can judge the draft. That skill transfers to every AI NPC scene you will ever prepare.
This article covers the whole run: setup, the character choice that most people get wrong, the four kinds of result you will see in the review list and what to do with each, applying the tags, and verifying them with a debug view almost nobody knows exists.
Also watch the full tutorial this article follows below:
Scene Tagger, named Scene Auto Tagger in the documentation, is an editor tool in the Convai Unreal Engine plugin that generates names and descriptions for objects in your level and applies them as scene metadata.
Scene metadata is the information Convai characters use to recognize what is around them, the static half of a character's environment context. Attach a Convai Object Component to an Actor with a name and a description, and every character in the level knows that object exists, what it is called, and what it is for. When a player asks what is in the room, the character answers from that.
Doing it by hand, through the scene metadata quick start path, is the bottleneck. A large 3D environment or virtual world holds hundreds or thousands of Actors, and someone has to open each one that matters, type a name, and write a sentence. Scene Tagger turns that from authoring into editing.
The museum in the tutorial is an example, not a constraint. The same run works on a factory floor, a retail space, a training environment, a digital twin, a VR build, or any level where an embodied agent needs structured information about what it is standing in.
Three things. An Unreal Engine project open in the editor on Windows with the Convai plugin installed. A signed-in session through the Convai window, with at least one character on your account. And an open level holding the objects you want tagged.
If the plugin is not in place, the setup tutorial and the getting started guide cover installation and sign-in.
Open the tool from the Scene Auto Tagger button in the editor toolbar, or from Tools under the Convai section. On first use it asks you to accept AI scene analysis, because the run sends captured images and your written guidance to Convai.
This is the part most people skim, and it is the single largest lever on output quality.
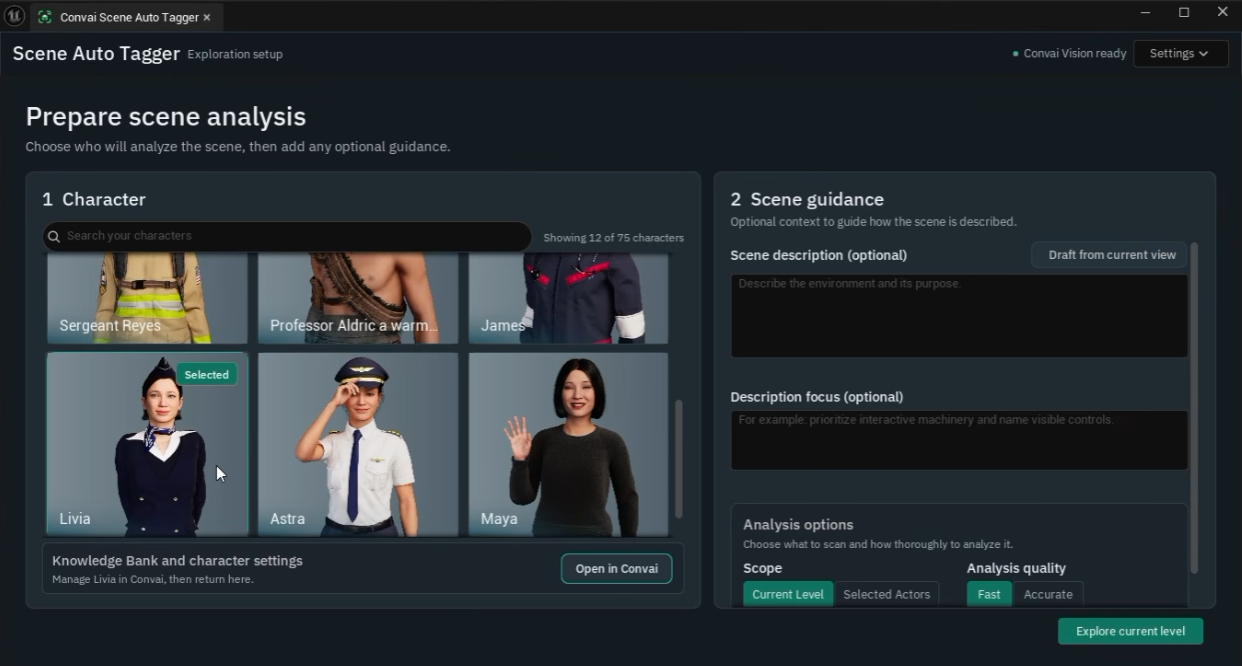
Scene Tagger does not run a generic vision model over your level. It uses the AI configuration, personality, and Knowledge Bank of a character you select from your Convai dashboard. You are pointing one of your own characters at your own environment and asking it what it sees.
So pick the character who belongs in that space. A museum guide for a gallery. A maintenance instructor for a plant. A retail host for a showroom.
Then feed that character before you run. Select Open in Convai from the tool, go to the character's Knowledge Bank, and upload the material that names the things in your scene. Exhibit catalogues, equipment manuals, reference documents, images, even video, which the In-Context Knowledge Bank reads as media rather than as a transcript. The tutorial uses a character named Livia and shows the upload path before returning to Unreal.
The payoff is direct. A tagger that has read your exhibit catalogue writes the artist and the period into the description. A tagger that has not writes a bronze statue of a seated cat.
There is a second, quieter payoff. The character that tags the level is the character that can later talk about it, and the tutorial ends by confirming the Character ID in the scene matches the one used for tagging. Tag with your guide, and your guide already knows the room, with long-term memory to carry what players ask about it.
Two optional text fields shape every description the run produces, and they cost a sentence each.
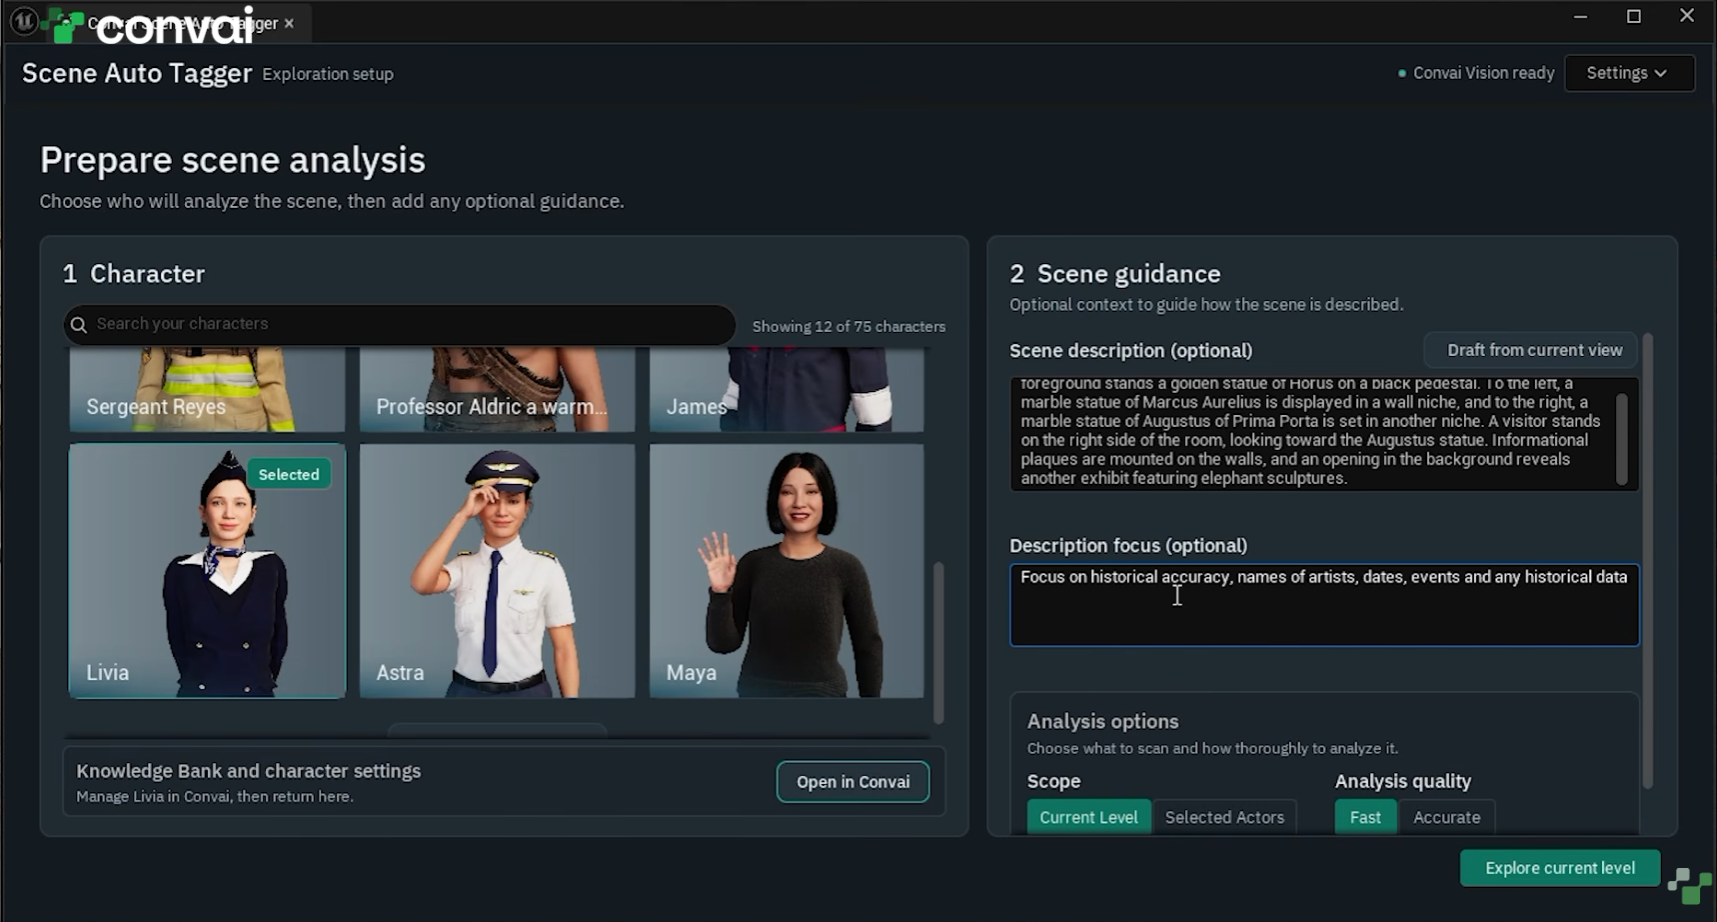
Scene description tells the tool what kind of place this is. A museum gallery with statues and paintings. You can type it, or frame a representative view in the level viewport and select Draft from current view, which writes a draft for you from what the camera sees. That draft is generated through the selected character, so any Knowledge Bank material you attached influences it too. Read it before you continue.
Description focus tells the tool what to pay attention to. The tutorial, working a museum, asks for historical accuracy, artist names, dates, events, and other historical detail. The documentation's own example asks for each exhibit's material, shape, and visible details.
These two fields are the difference between a description that helps a character hold a conversation and one that restates the mesh. Spend the sentence. The same discipline pays off in character backstories.
Scope decides what gets scanned. Selected Actors runs over eligible objects you have picked in the Level Editor, which is the right choice for a small group or a first test. Current Level discovers significant objects across the whole level.
Significant is the operative word. A whole-level run does not tag every wall. It looks for objects carrying detail or meaning, which is why the museum run surfaced artworks rather than architecture.
Accurate raises analysis quality for artwork, text, and specific subjects, at the cost of a longer run. For a gallery full of named paintings, it earns its time.
Re-analyze existing tagged objects decides whether the run revisits Actors that already carry a Convai Object Component. Leave it checked on a first pass over an untagged level. Clear it when you have hand-authored tags you do not want overwritten, which becomes the normal setting once a level has been through a few rounds.
Then press Explore. The tool moves a capture camera through the environment, photographing objects from several angles and looking for views with good lighting and visibility, hunting the angle that carries the most useful detail per object. It is computer vision pointed at your own render, and you can watch it work in the viewport.
Your level stays unchanged for the entire run.
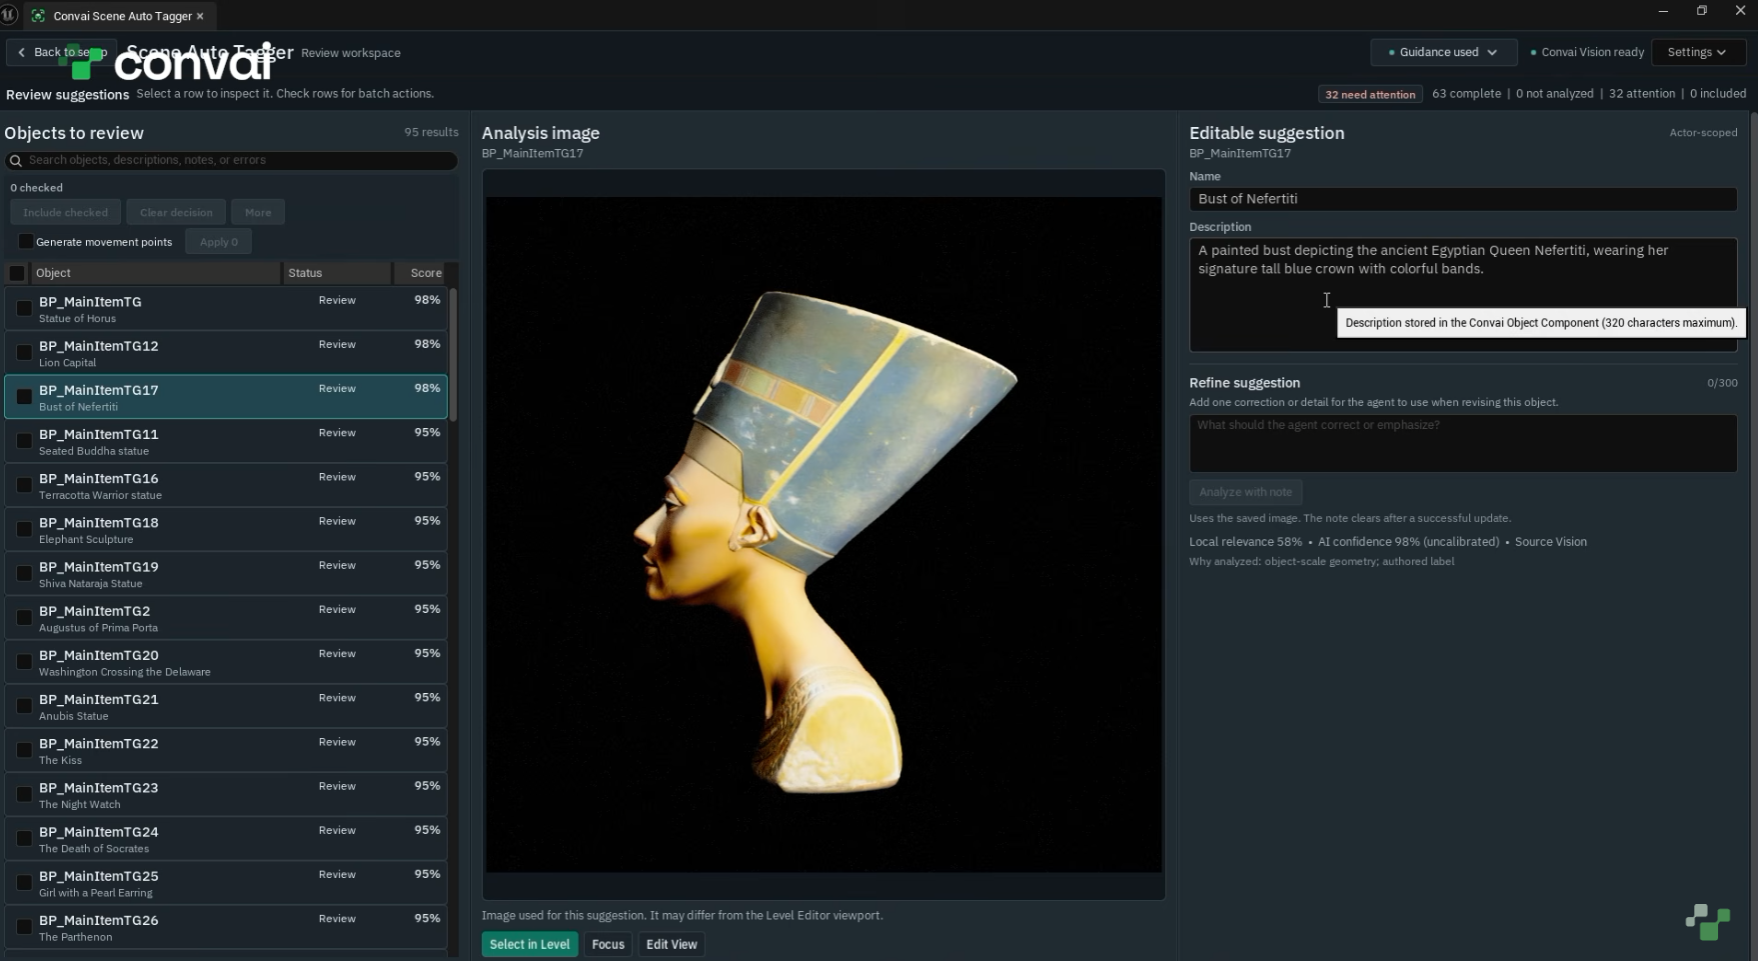
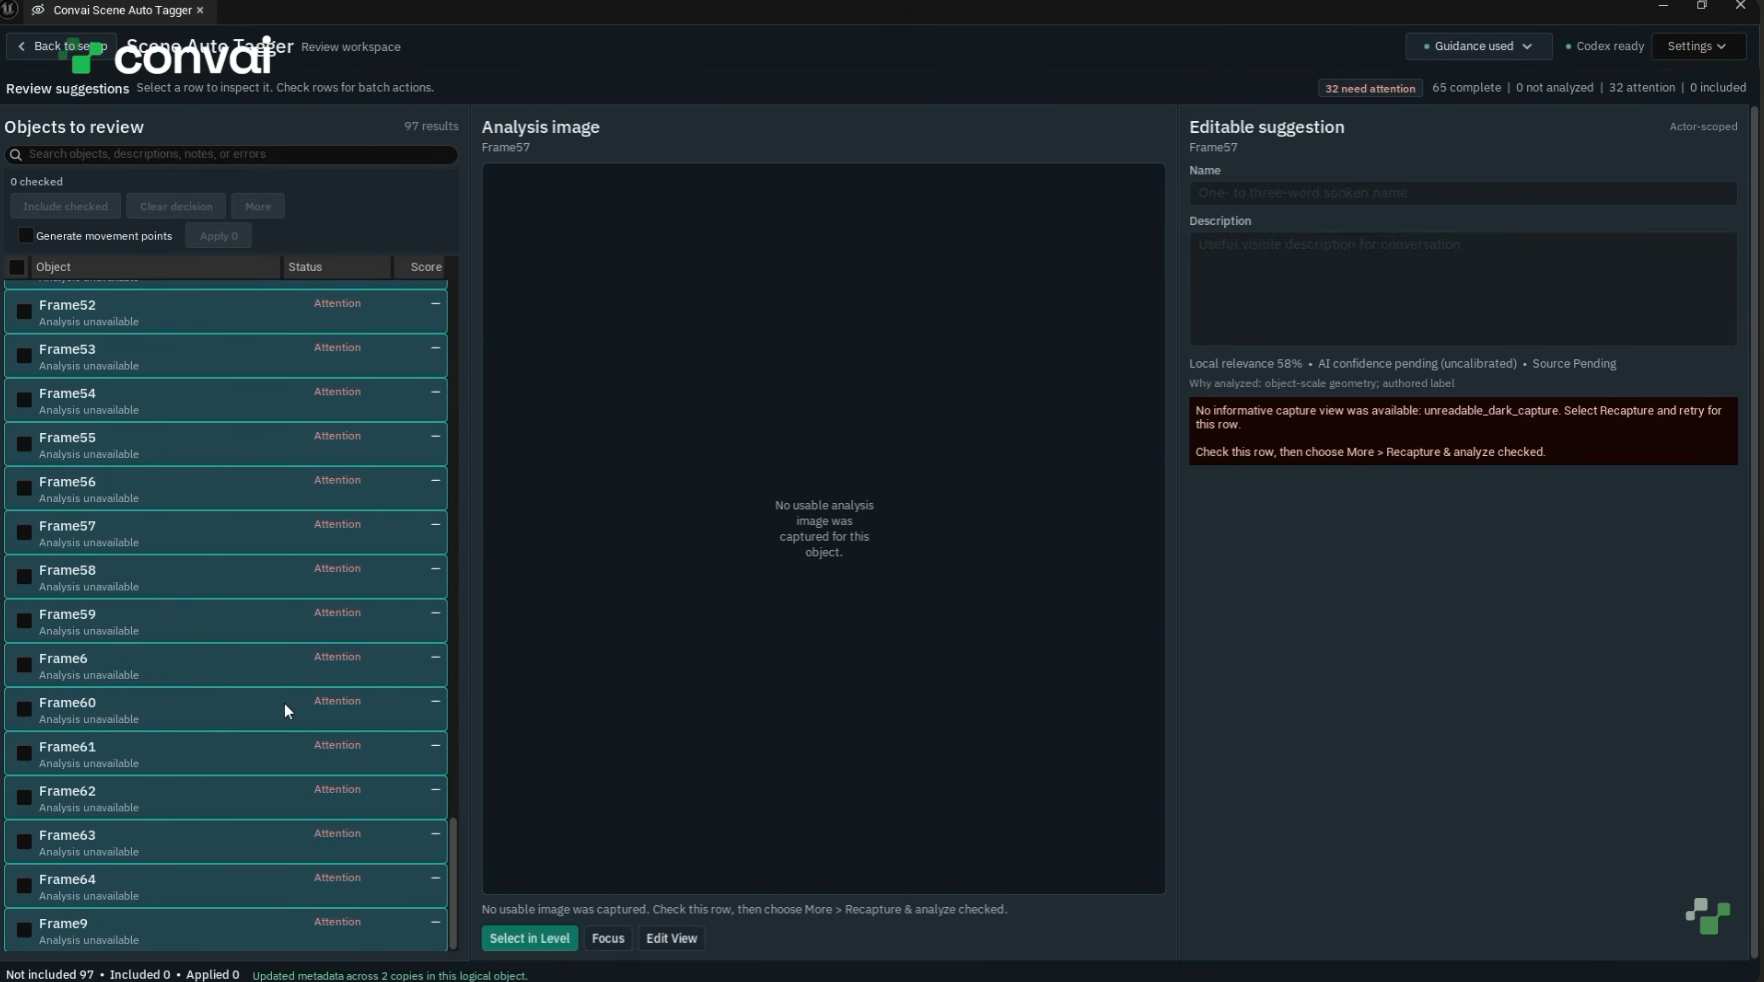
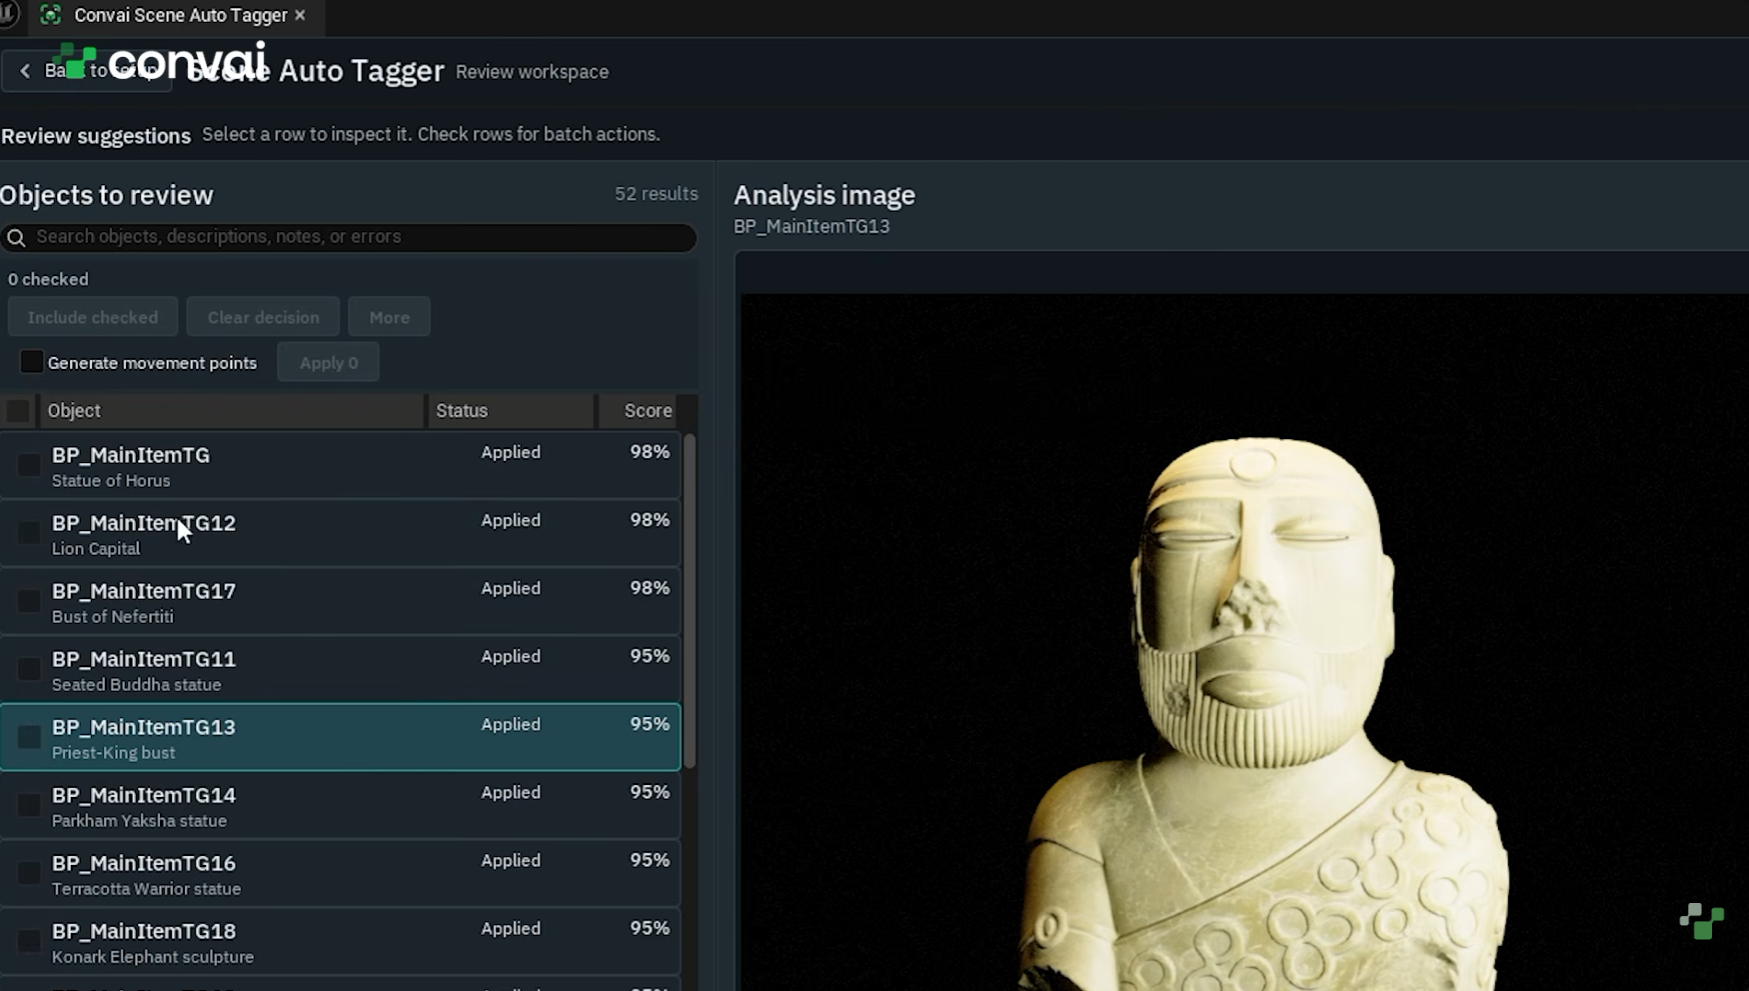
The museum run returned sixty-three objects analyzed and thirty-two needing attention. Sorting that list is the actual work, and every row falls into one of four cases. Knowing which case you are looking at tells you which button to press.
The tutorial's Nefertiti bust was captured from behind. The name and description came back correct anyway.
Leave it. The captured image is a means to an end, and the end is the text that reaches your character. A rear three-quarter shot that produced the right answer has done its job, because what reaches Convai is the object entry, not the picture. Reframing it costs time and buys nothing.
This case is more common than it looks, and treating it as a defect is the fastest way to turn a two-minute run into an afternoon.
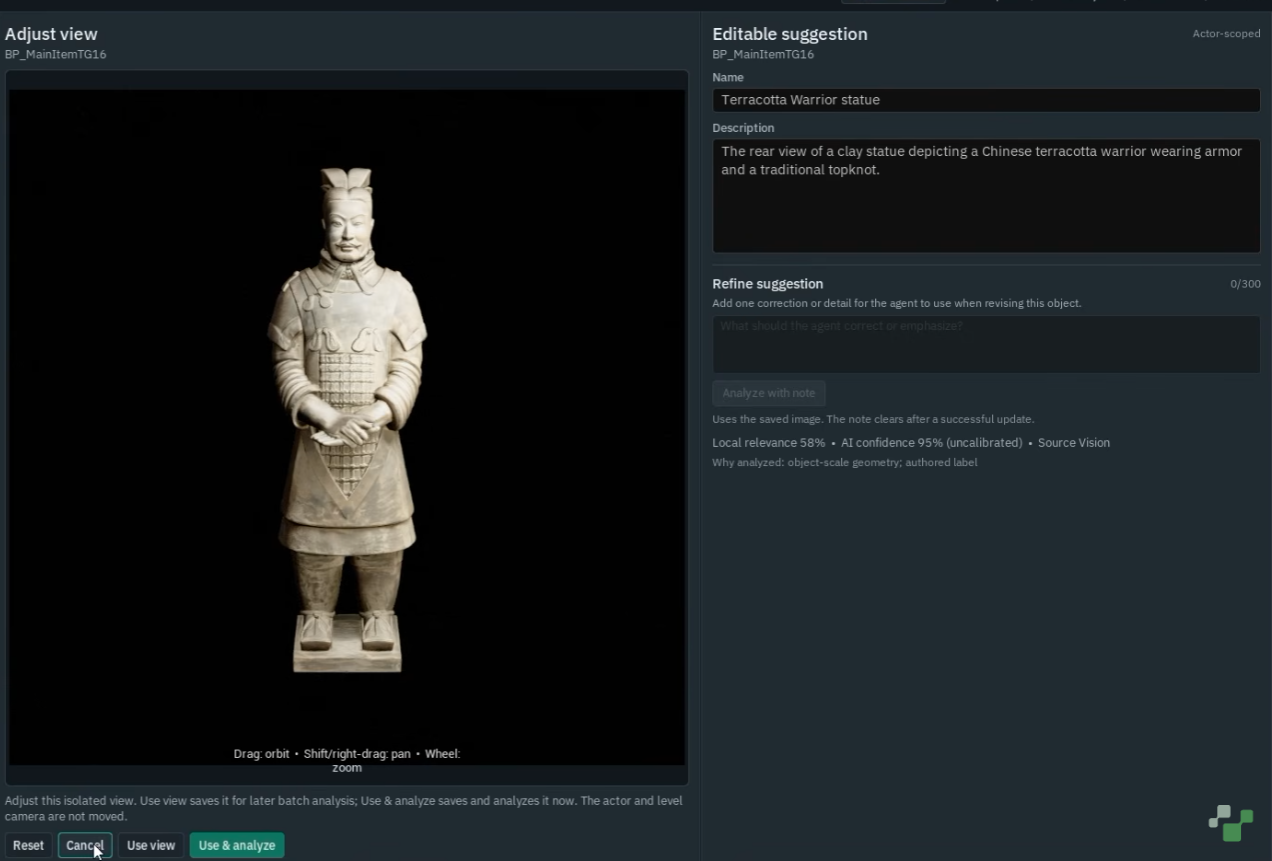
The tool photographed an elephant sculpture, identified it as an elephant, and stopped short of its actual name.
Select the row, enter a correction under Refine suggestion, and select Analyze with note. The tutorial types that this is the Konark Elephant, reanalyzes against the saved image, and the name updates.
This is the case where domain knowledge lives. The vision pass can see a carved elephant. It cannot know it is the one from Konark unless something tells it, whether that is a note you type or a catalogue you uploaded to the Knowledge Bank first.
If several rows share the same kind of mistake, check them and use More to run Analyze with notes or Analyze all checked as a batch rather than one at a time.
Some captures land on an angle that hides what identifies the object, and the description follows the picture into the wrong place.
Select Edit View under the image. Drag to orbit, shift-drag or right-drag to pan, scroll to zoom. These controls move the capture camera, not the object in your level, which matters more than it sounds: nothing you do in this view touches your scene.
Frame the detail that identifies the thing, then select Use and analyze to regenerate from the new angle.
The tutorial fixes three statues this way, checking them and running Analyze all checked together. They come back as the Tirthankara statue, the Parkham Yaksha, and the Priest-King of Mohenjo-daro. All three were unrecognizable from the angle the first pass chose and obvious from a better one.
Two flavors of this, and both are expected rather than broken.
The first is geometry with enough shape to look significant and no reason to be tagged. The tutorial finds a corner of static mesh geometry that the system considered worth a look. Every one of them had an asset-prefixed name, so a search on that prefix selected them in a batch for removal.
The second is what most of the needs-attention pile turned out to be: dark, unreadable captures. Enough geometry to be flagged as significant enough to look at, not enough visible detail to describe. Select and remove.
Removing a row clears it from the review list. It does not delete anything from your level.
That is the whole taxonomy. Accept, note, reframe, remove. Once you are sorting rows into four buckets rather than evaluating each one from scratch, a hundred-row list moves fast.
Worth knowing before you judge the drafts, because it gives you a standard to judge against. The scene metadata troubleshooting guide is direct about this, and the same standard governs safety-critical scenes where a wrong description is worse than none.
A fire extinguisher is a weak description. A red dry-chemical fire extinguisher mounted at eye level on the south wall next to the emergency exit is a strong one. Door is weak. A heavy steel pressure door with a yellow warning stripe leading to the decontamination chamber is strong. Box against a grey supply crate marked with a red cross, holding medical supplies, on the left shelf near the entrance.
The pattern behind all three: location relative to a landmark, visual identifiers such as color and size and material, and function where it matters. Write as a knowledgeable guide would speak, keep it scannable, and make it specific enough to pick the object out of a room.
Names follow the same logic in reverse. Short and natural beats long and technical, and the documentation is explicit that a front door reads better than an asset name. Convai receives the name in the object entry it uses to resolve references, so a clean name makes a character's references land. Names also have to be unique per level, or the subsystem renames the duplicate and logs a warning, which means the character may hear a label you never wrote.
You can edit both fields on any row before applying. The generated text is a starting point, not a verdict.
Check the rows you want, then select Include checked. Selecting a row to inspect it does not include it, which is the one step people miss. The feature guide calls it out for the same reason.
Then select Apply, which shows the count of included suggestions ready to go. The tool adds or updates a Convai Object Component on each of those Actors, carrying the generated name and description.
Verify one before moving on. Select a tagged object in the Level Editor, open Details, and find the component Scene Tagger added, which may appear under an auto-tag name in the component list. Under Object Entry, confirm the Name and Description match what you approved.
Then save your level. Applying tags and saving are separate actions, and a run you forget to save is a run you repeat.
If Apply is greyed out, one of three things is true: analysis is still running, Edit View is open and unfinished, or nothing completed is included yet. Finish or cancel the view editor, check at least one completed row, and select Include checked.
Worth understanding, because it explains a constraint that surprises people later.
Every Convai Object Component registers itself with the plugin's subsystem when play begins. When a chatbot component starts a session, it gathers those registered components, builds an action configuration payload, and sends it as part of the connect handshake. Objects added while the session is already live travel through a separate scene metadata update instead.
The constraint: objects present at session start live in a frozen snapshot. A description change to one of those cannot reach the character mid-session. Only objects new to the session go through the live lane. To push an edited description, stop the session and start it again.
That matters right after a tagging run. Apply tags, save, then restart play rather than expecting a running session to notice. The runtime environment API covers the objects that can arrive mid-session. Scene metadata is one of three context channels the plugin offers, alongside tracked properties for live state and attention for what a character is focused on right now. Tags are the static layer the other two build on.
The tutorial presses play and asks the character about a sculpture. The reply names it as a bronze of the goddess Bastet, seated as a cat, revered in ancient Egypt as a protector of the home and a symbol of fertility.
That answer came from a tag written minutes earlier by the same character now speaking it, the sort of exchange a guided experience is built out of.
Conversation is a fine spot check and a poor audit. Walking up to sixty-three artworks and asking about each one is slower than tagging them was. Which is why the next section exists.
Press Ctrl, Alt, and K during Play In Editor or in a development build. The Convai Debug Overlay opens, and it is the fastest way to check a tagging run.
If the chord does nothing, click into the viewport first, since a focused text field swallows it. A console command toggles the same overlay, and the key is configurable under Project Settings, Plugins, Convai. The overlay reference lists every panel and glyph.
What you get is a live view of what your characters know. The overlay marks every registered character and every registered object in world space with a diamond, and named enabled movement points with a hollow one. Page Up and Page Down cycle the selection, and holding Shift while paging switches between cycling characters and cycling objects.
For a tagging audit, the panel that matters is Surroundings. It lists the objects the selected character perceives with the exact sentence the character receives about each one, verbatim rather than summarized. Read those rows against your level and wrong tags announce themselves.
The header line tells you who you have selected, whether they are talking or idle, and what they are looking at. Context States and Facts show what else from dynamic context is influencing behavior, each state row carrying a pulse dot: red for respond always, amber for auto, grey for never.
The tutorial walks the museum with the overlay open, reading off the Great Wave, the Coronation of Napoleon, Girl with a Pearl Earring, the Night Watch, the Death of Socrates, and Washington Crossing the Delaware. Minutes to audit a level that took minutes to tag.
The overlay's right-hand column reports each object's relationship to the character and the player, and that comes from spatial awareness rather than from your tags.
Distance arrives in three bands. Under 1000 centimeters reads close by, under 4000 reads some distance away, and beyond that reads far away. A fourth state overrides all of them: when no walkable path exists, the fact reads with no walking path however near the object measures in a straight line.
Direction is computed in the observing character's own frame, so in front, behind, left, right, above, below, and combinations for diagonals. An object at the observer's position reads as right next to you instead of a direction. For other characters and the player, facing is reported too, toward or away, and omitted rather than guessed when it sits sideways.
Two options change the shape of that text. Relations describe how nearby things sit relative to each other rather than to the character, firing only between subjects within 600 centimeters so props across a room are not described as related. Player perspective adds a second clause locating each subject from the player's own camera frame, which lets a guide give directions without doing the rotation, at the cost of close to doubling the spatial text.
Line of sight is off by default. Turn it on and a subject behind a wall is reported as out of view rather than described from memory, at one line trace per character and subject per poll.
None of this is something Scene Tagger writes. It is computed from positions at runtime by the context subsystem. Your tags supply the names; spatial awareness supplies the where.
An object sits under Needs attention with no reliable suggestion. The capture did not carry enough information. Inspect the image, try Edit View and Use and analyze, or leave the object out.
Apply is disabled. Analysis is running, Edit View is open, or nothing completed is included.
Tags applied but the character does not recognize the objects. Check that the object entry name is not empty, since empty names are refused and logged. Check that actions are enabled on the chatbot component. And restart the session if the object was present at the last session start with a different description.
The character refers to an object by a name you never wrote. Two components share a name, and the subsystem renamed the duplicate. Filter the Output Log for the duplicate-name warning and give each object a unique one.
Distance or reachability reads wrong in the overlay. That is spatial awareness, not scene metadata. The usual cause is a navigation mesh that does not cover the area, so add a bounds volume and rebuild paths. Troubleshoot spatial awareness covers the rest.
For anything past that, the Convai Developer Forum is where setup questions go, alongside the guides and tutorials category, the thread for this tutorial, and an older thread on getting a character to understand objects in a room.
Tagging is preparation, not a destination. A level with named, described objects is the precondition for most of the things that make a character feel present in it.
A character can answer questions about what is around it, which is the tour guide case the tutorial flags as an upcoming video. It can be sent to a named object, since movement resolves destinations against registered entries. It can take actions whose Actor Reference parameters resolve against the same list, which is how a custom pickup action knows what a crate is. It can respond to gaze when a player looks at a tagged object, and it can be handed live state on top.
Every one of those systems reads the same registry Scene Tagger just filled. Which is the real argument for spending the extra sentence on the description focus field: you are not writing captions, you are writing the vocabulary your character will use for everything it does in that room, from a narrative beat to an AI teammate taking an action.
Also watch: the Convai YouTube channel for the rest of the Unreal Engine, Unity, and XR tutorial series.
Install the Convai Unreal Engine plugin from Fab, sign in through the Convai window, and create a character suited to the space you are tagging. Load that character's Knowledge Bank with your reference material before the run, open Scene Auto Tagger, or let the Convai MCP workflow for Unreal set the scene up first, and start with Selected Actors on a handful of objects to see the review list before committing to a whole level.
The Scene Auto Tagger guide covers each control, and the scene metadata quick start covers the hand-authored path for the objects you would rather write yourself.
What is Convai Scene Tagger in Unreal Engine?
Scene Tagger, named Scene Auto Tagger in the documentation, is an editor tool in the Convai Unreal Engine plugin that analyzes a level, identifies significant objects, captures a view of each, and generates a name and description. You review the suggestions and apply them, at which point the tool adds a Convai Object Component carrying that name and description to each Actor.
Does Scene Tagger change my level while it runs?
No. The level stays unchanged through analysis and review. Objects are modified only when you check rows, select Include checked, and then select Apply. Applying and saving are separate actions, so save the level afterward to keep the changes.
Why does the character I select for tagging matter?
Scene Tagger uses the selected character's AI configuration and Knowledge Bank to identify objects and write descriptions. A character loaded with material relevant to the scene, such as an exhibit catalogue for a gallery, produces names and descriptions that carry domain knowledge a generic pass would miss.
How do I fix an object that Scene Tagger named wrong?
If the capture angle is fine and only the name is incomplete, enter a correction under Refine suggestion and select Analyze with note. If the angle itself is the problem, select Edit View, orbit and pan and zoom the capture camera, then select Use and analyze to regenerate from the new view.
What does Needs attention mean in the Scene Tagger review list?
It means the analysis did not produce a reliable result from the captured image. A common cause is a dark or unreadable capture with enough geometry to look significant and too little visible detail to describe. Inspect the image, try another view, or leave the object out.
How do I remove objects I do not want tagged?
Check the rows and select More, then Remove checked from this review. This clears the entries from the review list without deleting anything from your level. Searching by asset name prefix is a fast way to select a group of unwanted captures at once.
How do I check every tag without talking to the character about each object?
Press Ctrl, Alt, and K during Play In Editor to open the Convai Debug Overlay. Its Surroundings panel lists the objects the selected character perceives with the verbatim sentence it receives about each one. Page Up and Page Down cycle the selection, and holding Shift while paging switches between characters and objects.
Why does my character not recognize an object I tagged?
Check that the object entry name is not empty, since the subsystem refuses unnamed objects and logs a warning. Check that actions are enabled on the chatbot component. And restart the session if the object was present at the last session start, because objects in the connect-time snapshot cannot have their descriptions changed mid-session.
What makes a good object description for a Convai character?
Include the object's location relative to a landmark, visual identifiers such as color and size and material, and its function where that matters. A red dry-chemical fire extinguisher mounted at eye level on the south wall next to the emergency exit is useful. A fire extinguisher is not.


